A NodeJS application calling a 3rd-party API

Hey! I'm Honza a.k.a. (on the web) #crs1138. I'm a web developer specialising in Wordpress based websites, creating custom Gutenberg blocks and adjusting the tooling necessary to do so.
I work currently as a front-end developer at Leadtech, Barcelona.
P. S. '#crs1138' is an online identity that I came up with many years ago. It's made of an acronym of my nickname (from the Czech free-techno scene) and the number refers to George Lucas' cult film THX1138.
This article aims to sum up my learning from developing and deploying my first NodeJS application. The idea is that I need to access somebody else's server to receive information. The communication with the server is only possible through a security token which I don't want to reveal to the visitor of my front-end.
TL;DR
You can see the app in action at my node-api-call.heroku.com. It should work as long as Aztro – the 3rd-party API is still functioning. Either way, you're welcome to have a look at my code at my Github repo – node-api-call.
What I wanted to achieve
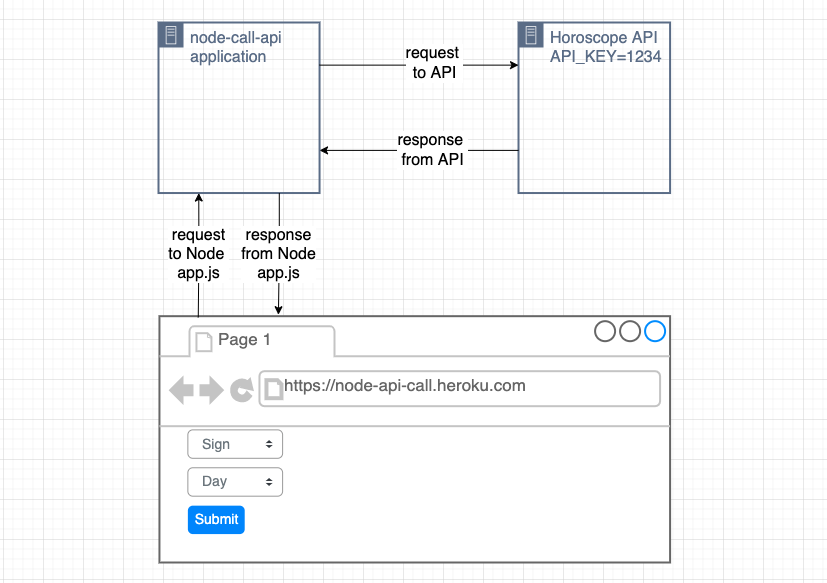 Fig. 1 – Communication diagram between visitor's browser our server and the 3rd-party API
The diagram above can be read as:
- Visitor of the webpage submits the input data and the browser sends a request to my server-side application running on the Heroku platform
- My application decides the browser's request requires sending a request to the 3rd-party API, attaching the API's authentication key.
- The 3rd-party API answers the request with a response.
- My app processes the response and answers to the browser.
- The browser receives the answer and processes it.
- If the answer is correct the browser will display the horoscope for the requested day and Zodiac sign.
Prerequisites
- Install NodeJS locally; I use the NVM (Node Version Manager). I'm using the Node@v16
- Create a Heroku account – optional, you can use Vercel or any other Node platform out there
- Create a RapidAPI account and register an app based on the Aztro API
- I presume you have a basic knowledge of Javascript, HTML, CSS and know how JS works in the browser.
- I expect you to know how to use Git and to have your own Github account and know how to interact with it.
What have I learned
- Axios – a promise based HTTP client for NodeJS.
- ExpressJS – a NodeJS web application, this is the server and a router, processing visitors' requests and providing their browsers with responses.
- Dotenv – a module that loads environment variables into
process.env. - hbs – ExpressJS view engine for handlebars.js
- Heroku – a platform that let me publish my NodeJS application to the world.
Step 1: Axios – fetch the data from the remote API
See the axios branch.
My first goal was to get my NodeJS to communicate with the Aztro API.
Even though NodeJS has announced the arrival of Fetch API to its v17.5 as an experimental feature, the popular way of fetching HTTP requests is undoubtedly using Axios.
To achieve this goal, I created a new Git repo, linked it with Github.
- Then I initialised a new Node Package Module with the default values
npm init --yes. You can always edit them later on. - Installed the Axios and Dotenv packages
npm install axios dotenv. - Created the basic file structure.
- Added the
.envfile containing theRAPIDAPI_KEY. I also added the.envfile to the.gitignoreso the token is not made public. Use your own instead.
RAPIDAPI_KEY=2d7d***...***8037
At this point my app had the following structure:
.
├── .env
├── .gitignore
├── package-lock.json
├── package.json
└── src
    ├── app.js
    └── astrology.js
The src/app.js contains the code necessary for importing the src/astrology.js, creating and calling the asynchronous call of the call to the Aztro API.
// src/app.js
require('dotenv').config()
const HoroscopeAPI = require('./astrology')

const asyncApiCall = async () => {
        const response = await HoroscopeAPI.getHoroscope('gemini', 'today')

        console.log(response.data)
}

asyncApiCall()
To test the app so far, you can launch node src/app.js. Note that the initiation of the require(dotenv).config() needs to come before requiring the src/astrology module otherwise the value of RAPIDAPI_KEY won't be available to the code responsible for communicating with the API.
Note: Dotenv loads the environment variables that are stored in the
.envfile in the root of the project. You might have noticed that this file is not included in the repository. That's right. I configured Git to ignore that file and that is where my project-specific secrets are kept. In this case, the secret is theRAPIDAPI_KEY. I subsequently set the value of this variable on the server hosting the staging and production versions of the web app.
// src/astrology.js
const axios = require('axios')
const BASE_URL = `https://sameer-kumar-aztro-v1.p.rapidapi.com/`

options = {
        method: 'POST',
        url: BASE_URL,
        params: { sign: 'gemini', day: 'today' },
        headers: {
                'x-rapidapi-host': 'sameer-kumar-aztro-v1.p.rapidapi.com',
                'x-rapidapi-key': process.env.RAPIDAPI_KEY,
        },
}

module.exports = {
        getHoroscope: (sign, day) => axios(options),
}
Notice the hardcoded values for the API call where
options = { ...
  params: { sign: 'gemini', day: 'today' }
  ...
}
If everything works as it's supposed to then you should see something like this in your terminal.
{
  date_range: 'May 21 - Jun 21',
  current_date: 'March 20, 2022',
  description: "You're an open book these days and anyone who stops to read your pages better be prepared for the unbridled truth. Some will admire your frankness, while others might be shocked.",
  compatibility: 'Taurus',
  mood: 'Truthful',
  color: 'Navy Blue',
  lucky_number: '54',
  lucky_time: '2pm'
}
Step 2 – The application serving UI to the visitor and processing their requests
See the basic-app branch.
Well, I have the axios() part working. It's time to move on to the next step – creating an app that processes requests that come from visitors' browsers and provides them with a user interface.
I've refactored the code, giving the src/app.js more of the prominent encompassing role whilst moving the other code around to src/utils/astrology.js and for Handlebars based templates into the src/templates/ folder.
You can see the refactored structure in the following diagram:
.
├── .env
├── .gitignore
├── package-lock.json
├── package.json
├── public
│   ├── css
│   │   └── styles.css
│   └── js
│       └── app.js
└── src
    ├── app.js
    ├── templates
    │   ├── partials
    │   │   └── header.hbs
    │   └── views
    │       ├── 404.hbs
    │       └── index.hbs
    └── utils
        └── astrology.js
ExpressJS
Express is a minimal and flexible Node.js web application framework that provides a robust set of features for web and mobile applications.
I've decided to use ExpressJS to help me with responding to the requests coming from the visitor's browser as well as launching the Axios requests to the Aztro API. It is pretty much my first deployed interaction with ExpressJS, so I am no expert, but it seems reasonably straightforward and well documented. I guess that's one of the reasons why it's so popular.
I have implemented the following responses to what the visitor might try to do:
- A general request to the homepage:
/ - A
POSTrequest submitted by the form on the generic app's page/horoscope - Anything else –
*– should produce a 404 error
The application setup
First, I instantiate the ExpressJS app and tell it to parse incoming requests as JSON.
// src/app.js
// Create the app
const app = express()

// Add JSON parsing middleware
app.use( express.json() )
Handling the Handlebars templates
Next, I set up the app to handle serving the responses to the browser using the Handlebars (hbs) view engine.
// src/app.js
// ...
// Define paths for the HBS config
const viewsPath = path.join(__dirname, './templates/views')
const partialsPath = path.join(__dirname, './templates/partials')

app.set('view engine', 'hbs')
app.set('views', viewsPath)
hbs.registerPartials(partialsPath)

// Setup static directory to serve
app.use(express.static(path.join(__dirname, '../public')))
I set the default view engine to 'hbs'. This will enable me to render the .hbs files when the response.render() function is called using Handlebars.
I tell the ExpressJS app where to look for the Handlebars views. There are only two views for this app – index.hbs (for the rendering of the app) and 404.hbs (this is used to render any other route as a 404 error page). I pass the path to these views to the views property of the ExpressJS app.
Next, I let the hbs know where to look for all the template partials, passing their path to the hbs.registerPartials() function. In our case, the only partial so far is the header.hbs.
App's routing
The first route is for the index page that will be shown to visitors when they access the app. The app.get(path, callback) function tells our app when a GET request comes to react with the callback middleware. For my purpose, the response is to render the index view with the title variable being set to Horoscope.
// src/app.js
// ...
// Create base URL route "/" and render index view
app.get('/', (request, response) => {
    response.render('index', {
        title: 'Horoscope',
    })
})
The second route is the one that I shall use for processing the API request. The route is /horoscope and it matches the request's route defined in the fetch call from the frontend JS located in /public/js/app.js. This request carries data in the format of JSON made out of an object with two properties: sign and day.
// src/app.js
// ...
// Response to the POST request made by submitting the app's form
app.post('/horoscope', async (request, response) => {
    const { sign, day } = request.body

    if (!sign || !day) {
        return response.status(404).send({
            error: 'Please provide all details',
        })
    }

    try {
        const horoscope = await HoroscopeAPI.fetchHoroscope(sign, day)

        const { data } = horoscope
        return response.json({ data })
    } catch (err) {
        console.error(err)
        return response.status(500).json({
            error: 'Something went wrong on the server side',
        })
    }
})
Destructuring the sign and day properties from request.body, making sure they are defined, I try to call the asynchronous function that I developed in the first step.
I moved the code into its own partial /src/utils/astrology.js – very handy if there was more than one method to interact with the Aztro API.
Have a look for yourself as I adapted the structure a little bit to make it work as a self-contained JS module providing the HoroscopeAPI.fetchHoroscope(sign, day) method. This method creates a closure over the Axios call making sure we can pass the sign and day variables and sets the remaining necessary options (url, method, request's headers).
// /src/utils/astrology.js
const axios = require('axios')
const BASE_URL = `https://sameer-kumar-aztro-v1.p.rapidapi.com/`

module.exports = {
    fetchHoroscope: (sign, day) => {
        const options = {
            method: 'POST',
            url: BASE_URL,
            params: { sign, day },
            headers: {
                'x-rapidapi-host': 'sameer-kumar-aztro-v1.p.rapidapi.com',
                'x-rapidapi-key': process.env.RAPIDAPI_KEY,
            },
        }
        return axios(options)
    },
}
And last but not least is the route for any other requests. This is to respond to such requests with a 404 error page.
// Catch all route, renders 404 page
app.get('*', (request, response) => {
    response.render('404', {
        search: 'page',
    })
})
After that, the only thing left to do is set the web server's port and let the server listen for incoming requests.
// Initialize application port
const port = process.env.PORT || 3000

app.listen(port, () => {
    console.log(`Server is up on port ${port}`)
})
Shortly about the frontend (read browser) Javascript
All the static code intended for the use in visitor's browser can be found in the /public/css and /public/js folders. I presume that is nothing too new for you and thus I shall focus only on the part that actually sends requests to the server.
    fetch('/horoscope', {
        method: 'POST',
        body: JSON.stringify(data),
        headers: {
            'Content-Type': 'application/json',
        },
    })
        .then((response) => {
            return response.json()
        })
        .then((response) => {
            console.log({ response })
            const { data } = response
            results.textContent = data.description
        })
        .catch((err) => {
            results.textContent = err
        })
The request is sent the /horoscope path as mentioned above. The body of the request is a JS object converted to the textual representation of JSON. I tell the server that the body is in that format by providing the 'Content-Type': 'application/json' header. The fetch() function returns a promise with a response and when this resolves the response.json() returns a promise that resolves into an object with the data property. That explains the need for the chain of then() methods. If you're not sure how this works, I recommend you use console.log() to reflect on the sequence of the two promises and what results they provide.
Please notice, as soon as the form is submitted, I display the 'Loading…' text that is then replaced with the response from the server. This can be either the results received from Aztro API or a generic error message in case of any problem the server might experience.
Cover image Fishy Fish by Emma Plunkett Art